Page 8 - June-Month
P. 8
TECHNICAL PAPER


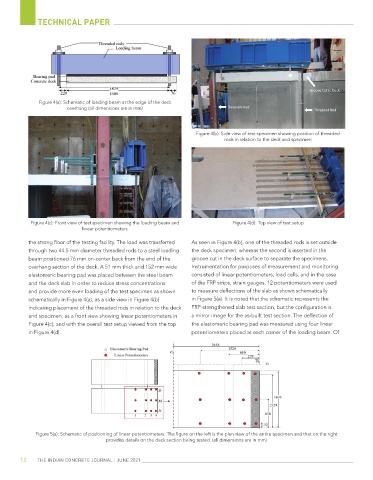
              Figure 4(a): Schematic of loading beam at the edge of the deck
                        overhang (all dimensions are in mm)


                                                                   Figure 4(b): Side view of test specimen showing position of threaded
                                                                             rods in relation to the deck and specimen


           Figure 4(c): Front view of test specimen showing the loading beam and   Figure 4(d): Top view of test setup
                             linear potentiometers
           the strong floor of the testing facility. The load was transferred   As seen in Figure 4(b), one of the threaded rods is set outside
           through two 44.5 mm diameter threaded rods to a steel loading   the deck specimen, whereas the second is inserted in the
           beam positioned 76 mm on-center back from the end of the   groove cut in the deck surface to separate the specimens.
           overhang section of the deck. A 51 mm thick and 152 mm wide   Instrumentation for purposes of measurement and monitoring
           elastomeric bearing pad was placed between the steel beam   consisted of linear potentiometers, load cells, and in the case
           and the deck slab in order to reduce stress concentrations   of the FRP strips, strain gauges. 12 potentiometers were used
           and provide more even loading of the test specimen as shown   to measure deflections of the slab as shown schematically
           schematically in Figure 4(a), as a side view in Figure 4(b)   in Figure 5(a). It is noted that the schematic represents the
           indicating placement of the threaded rods in relation to the deck   FRP-strengthened slab test section, but the configuration is
           and specimen, as a front view showing linear potentiometers in   a mirror image for the as-built test section. The deflection of
           Figure 4(c), and with the overall test setup viewed from the top   the elastomeric bearing pad was measured using four linear
           in Figure 4(d).                                        potentiometers placed at each corner of the loading beam. Of


             Figure 5(a): Schematic of positioning of linear potentiometers. The figure on the left is the plan view of the entire specimen and that on the right
                                     provides details on the deck section being tested. (all dimensions are in mm)


        12    THE INDIAN CONCRETE JOURNAL | JUNE 2021

